Basic configuration
In this section we will take care of some general configuration that is good practice in all networks as well as some configuration that will help us avoid problems later on.
Hostnames
Explanation
Providing a meaningful hostname prevents confusion when remotely accessing a switch or router. By default the devices terminal prompt will display the current hostname providing certaintity as to what you are configuring.
What you need to do
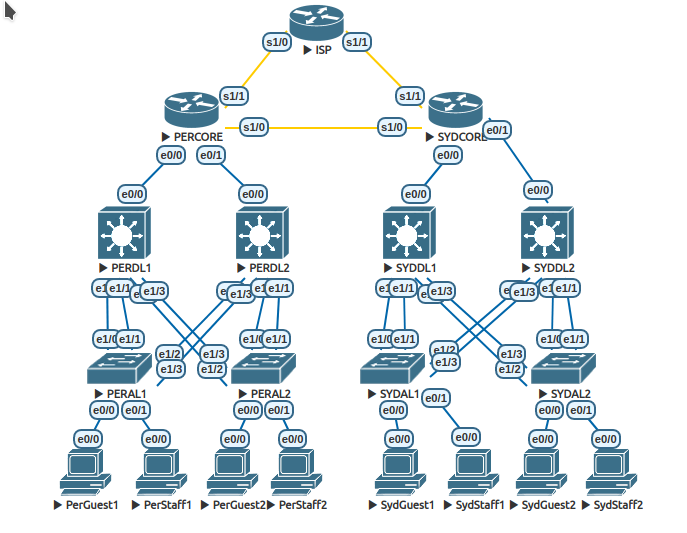
Configure hostnames as indicated in the diagram above on every device except for the ISP. The ISP router is preconfigured and you should not make changes on that device as it is not owned by the California Hotel group. Be sure to include your host PCs in this exercise.
Where to configure this
Directly on each device.
How you will know it is configured correctly
The hostname can be seen in the device prompt. When unconfigured, devices default to the names “Router” and “Switch”. Once configured correctly the device should have the same prompt as its name. Note that the PCs are really routers disguised as PCs so their prompt will start as “Router>”.
Suggestion
Throughout this case study, you have many devices to configure, often with the same or similar commands. It is worthwhile creating a sequence of common commands in an editor such as “notepad” or “gedit” and pasting these into your switches and routers to save time. For example, the following can be pasted into each switch to set the hostname.
enable
config t
hostname SYDCORE
exit
Copying the block of text and pasting it (right click) into the terminal window of the SYDCORE router results in the following:
Router>  [Right mouse-click and "paste" text here]
Router>enable
Router#config t
Enter configuration commands, one per line.  End with CNTL/Z.
Router(config)#hostname SYDCORE
SYDCORE(config)#exit
SYDCORE#
Applying a different hostname on another device invloves changing the name in the text file, copying the commands and pasting into the new terminal which is much quicker and less error prone ase well. You can also add other “standard” commands to your text file and apply these at the same time. It may be worth reading ahead to see what other commands are needed so you can combine these where possible.
Cisco Discovery Protocol (CDP)
Explanation
CDP is a Cisco proprietary layer 2 protocol that allows two connected Cisco devices to share information about the others party’s configuration. Although it is a useful tool that can detect incompatible settings (like 100 Mbps interface trying to communicate with a 1 Gbps interface) it can also provide an attacker with valuable information such as the firmware version running on a device. CDP can also generate annoying error messages about the physical layer due to EVE’s fairly crude modelling of links. For these reasons we will disable the CDP duplex messages on all of the devices under our control.
(Note: The EVE/IOS combination used in 2024 didn’t exhibit the duplex errors of previous years. However, I have left the requirement for this configuration in for consistency.
What you need to do
On each device, disable CDP duplex messages with the following command:
Router(config)#cdp tlv-list MURDOCH
Router(config-tlv-list)#duplex
Router(config)#cdp filter-tlv-list MURDOCH
Where to configure this
Directly on every device except the ISP router.
How you will know it is configured correctly
The duplex error messages should stop.
You can confirm that the rules have been correctly defined with:
PERDL2#show cdp tlv-list *
Tlv-list : MURDOCH
 Duplex
Applied on: Globally
Could you expect to see any questions on CDP or VTP in the practical exam?
There will be no CDP or VTP questions on the practical exam. The commands to disable these protocols will already be applied.
Activating router interfaces
Explanation
A router is a layer 3 device and cannot be used in a network without configuration. Thus there is no point in having the interfaces default to being active. Having unused interfaces shutdown also reduces the security acttack surfaces of the device.
What you need to do
On each layer 3 router (not multilayer switches) perform a no shutdown on the interfaces shown in the diagram. As the routers all have some interfaces that are not connected, you need to take care to only activate interfaces that are actually in use. Unused interfaces should remain shutdown. As we are simulating hosts using routers you also need to perform a no shutdown on the e0/0 interfaces of the hosts.
Where to configure this
Directly on the two core routers and the eight host PCs.
How you will know it is configured correctly
The show ip interface brief will reveal which interfaces are still in a shutdown state.
PerGuest1#show ip interface brief
Interface                  IP-Address      OK? Method Status                Protocol
Ethernet0/0                unassigned      YES TFTP   up                    up
Ethernet0/1                unassigned      YES TFTP   administratively down down
Ethernet0/2                unassigned      YES TFTP   administratively down down
Ethernet0/3                unassigned      YES TFTP   administratively down down
PerGuest1#
In the example abouve a no shutdown was performed on e0/0 so it is no longer administratively down. Keep in mind that it is not necessary that an interface be up after applying a no shutdown. Whether an interfaces comes up after a no shutdown depends on the technology (ethernet/serial) and the status of the connected party. The important thing is that the interface you want to activate is not in an administratively down state.
Could you expect to see any questions on shutdown interfaces in the practical exam?
Absolutely! Remember that show ip interface brief command to both check IP addresses and the up/down/administratively-down status of the interface.
Disabling unused switch interfaces
Explanation
A switch without configuration can be used to create a simple LAN. For this reason, most vendors supply switches in a default state with all interfaces active. In this way they can be used “out-of-the-box” with no configuration. From a security perspective, best practice in many organisations sees unused switch interfaces placed in a shutdown state.
What you need to do
On each switch (both pure layer two and multilayer switches) perform a shutdown on the interfaces that are not in use. You can see which interfaces are present on the switch with the show ip interface brief command.
PERDL2#show ip interface brief
Interface              IP-Address      OK? Method Status                Protocol
Ethernet0/0            unassigned      YES unset  up                    up
Ethernet0/1            unassigned      YES unset  up                    up
Ethernet0/2            unassigned      YES unset  up                    up
Ethernet0/3            unassigned      YES unset  up                    up
Ethernet1/0            unassigned      YES unset  up                    up
Ethernet1/1            unassigned      YES unset  up                    up
Ethernet1/2            unassigned      YES unset  up                    up
Ethernet1/3            unassigned      YES unset  up                    up
PERDL2#
You can see here that PERDL2 has eight interfaces present even though only five are seen to be in use in the topology diagram.
Where to configure this
Directly on the four DL (Distribution Layer) switches and the four AL (Access Layer) switches.
How you will know it is configured correctly
The show ip interface brief will reveal which interfaces are in a shutdown state.
PERDL2#show ip interface brief
Interface              IP-Address      OK? Method Status                Protocol
Ethernet0/0            unassigned      YES unset  up                    up
Ethernet0/1           unassigned      YES unset  administratively down down
Ethernet0/2            unassigned      YES unset  up                    up
Ethernet0/3            unassigned      YES unset  up                    up
Ethernet1/0            unassigned      YES unset  up                    up
Ethernet1/1            unassigned      YES unset  up                    up
Ethernet1/2            unassigned      YES unset  up                    up
Ethernet1/3            unassigned      YES unset  up                    up
PERDL2#
You can see above the change in status to administratively down after performing a shutdown on interface Ethernet0/1.
Could you expect to have to shutdown interfaces in the practical exam?
Yes, you could be asked to do this as part of changes to the network or to facilitate testing or simulating a link failure.
Embed your student number in EVE topology
Explanation
To save confusion on the part of the unit coordinator when examining many configurations, please embed you student number within your EVE environment in the following ways:
Loopback on the ISP router
Add a loopback (virtual interface) to the ISP routers as shown below.
ISP>enable
ISP#conf t
ISP(config)#interface loopback 33445566   <-- substitute your student number
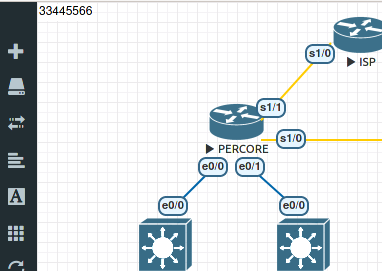
Label your topology
-
From the EVE menu on the left use [+ add-node] > [A text] to create a label on your topology with student number in the top left corner as shown in the example below.
Export your configuration files so that they are captured within the EVE lab.
- More actions
- Export all CFGs
- Wait untill all the notifications end. They should be blue (information) or green (success) only. Red messages need to be investigated and resolved before turning off the devices.
How you will know it is exported correctly?
- From the left-hand EVE menu click on Startup-configs and then click on the name of individual devices to see the configuration EVE has captured.
If you configurations appear here it is safe, to power off the devices and exit the lab back to the menu. You can have confidence that the configurations are saved and you will be able to return to your work.
- If you are satisfied the configuration is there (if you exported it will be) then you can use more actions > stop all nodes to turn off the devices.
- Once the devices are off you are able to exit the lab using the Close lab EVE menu item.
Set the Author of you topology file
Within the EVE filemanager you will see your Cate Study Topology file.
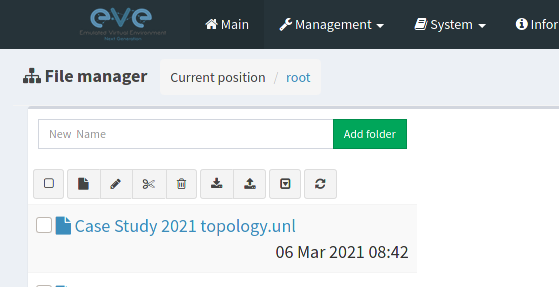
- Click on the file name to reveal the edit button
-
Click edit
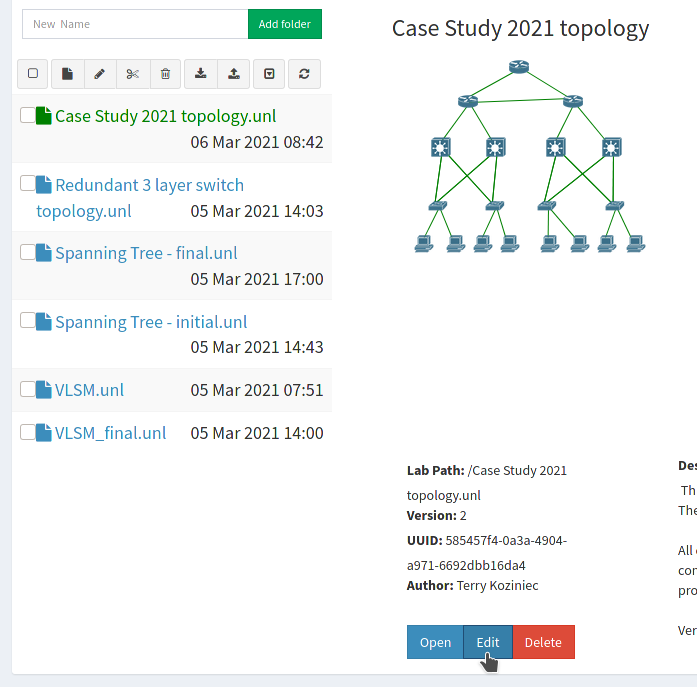
- Change the Author field to include your name.
- Click save
Exporting your Topology as a ZIP file for backup or to submit for an assessment.
Your configurations within the EVE environment, hosted within the data centre are NOT BACKED UP! This is your responsibility and very easily done.
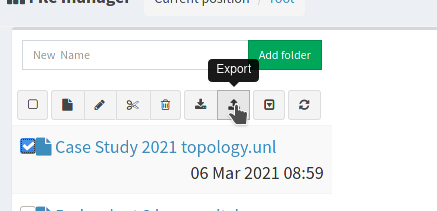
- Click in the small check box to the left of the file you wish to export as a ZIP file.
-
The file should have blue tick as shown in the image below. Clicking the export button will save the file on your local computer. There it can server as a backup or be uploaded via LMS for submission.
EVE saves the ZIP file with a name that reflects the time and day on which it was produced. You are free to rename this to something more meaningful to you. Just be sure to keep the .zip extension. EVE will be able to read it with a new filename. If you upload your file back into EVE it will open with the same name it had when you clicked “export”.